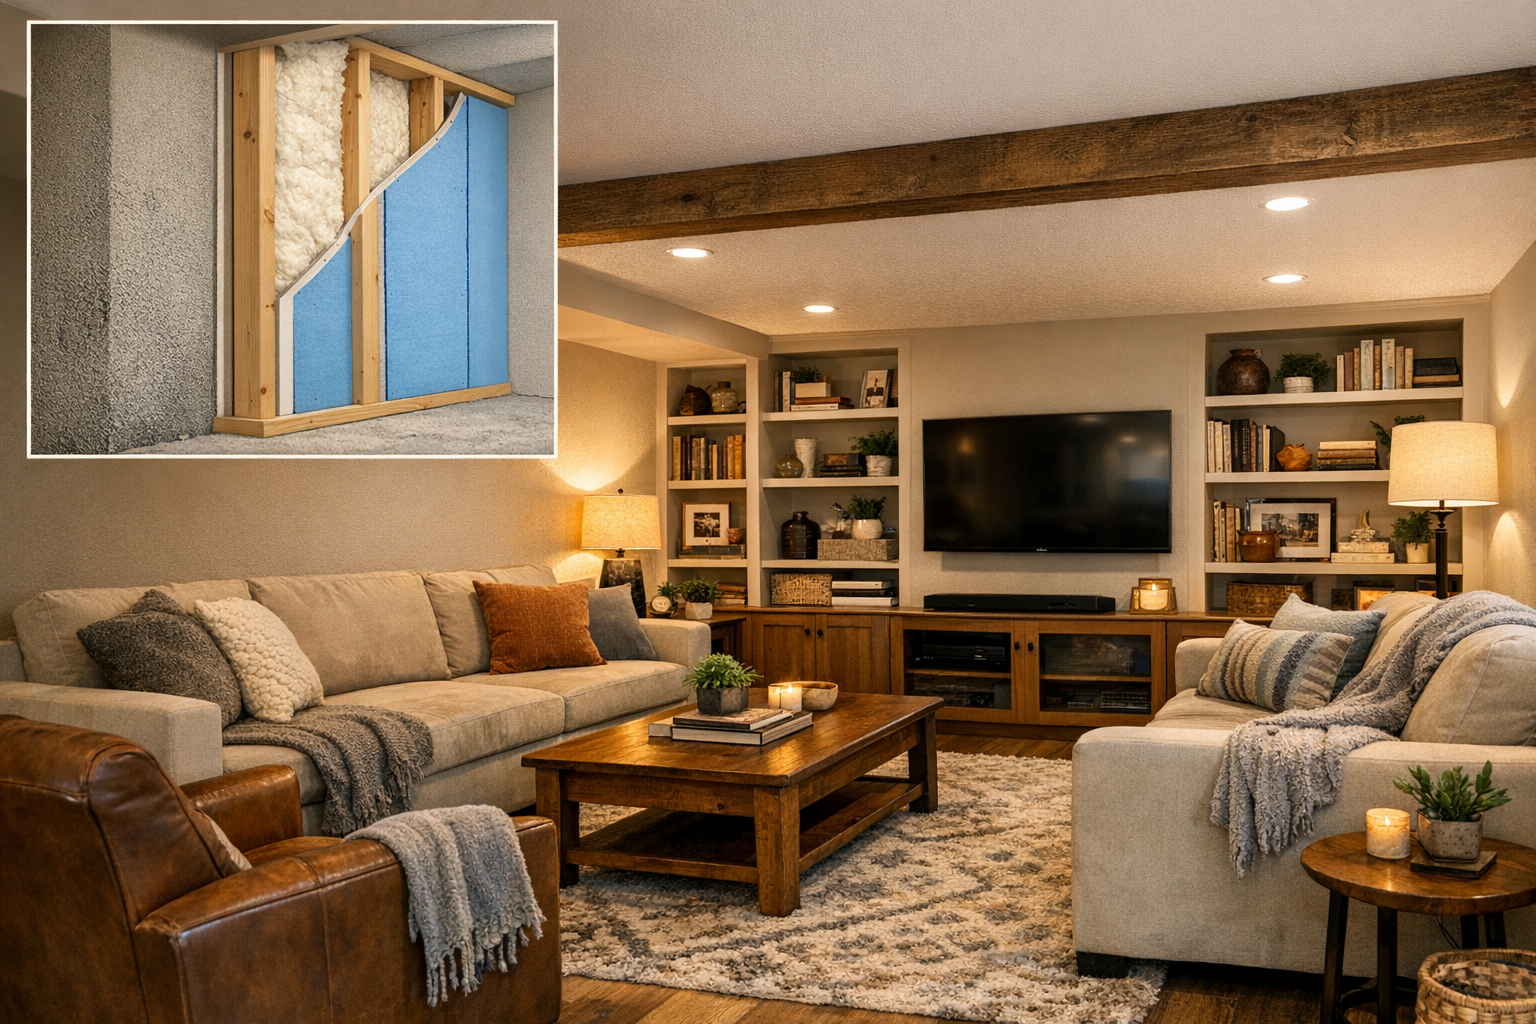
Insulation Types for Basement Walls: A Homeowner’s Guide to Warmer, Drier Spaces
Basements are unique environments: they sit below grade, touch cool soil, and constantly battle moisture. The right wall insulation strategy can transform that chilly, musty zone into a comfortable, resilient extension of your living space. This guide unpacks how moisture behaves below grade, compares insulation types, explains R-values and code expectations, and shares field-tested assemblies that strike the best balance of comfort, durability, and cost.
Why Basement Wall Insulation Matters
Basement walls don’t behave like above-grade exterior walls. They are in direct contact with soil that stays cool year-round, which means heat from your home flows outward through the concrete. Because concrete is porous, it can also transport moisture via capillarity and vapor diffusion. Thoughtful insulation interrupts those heat and moisture pathways, resulting in a healthier building.
- Basement walls sit against cool, damp soil that wicks heat away, increasing energy use and making floors above feel cold.
- Proper insulation reduces heat loss and moderates humidity, limiting condensation that leads to mold and musty odors.
- Insulating the foundation walls—rather than only the basement ceiling—keeps the entire building envelope warmer and protects plumbing and mechanicals.
- Well-designed assemblies make finishing the basement easier, add appraised value, and support code compliance.
Rule of thumb: If the concrete feels cool to the touch, your home is losing heat through it. Insulation is the fix, but only if moisture is managed first.
Moisture First: Rules You Must Follow
Before adding any insulation, deal with water. Below-grade assemblies fail when bulk water or unmanaged vapor gets trapped behind finishes. The goal is to create a warm, continuous, and reasonably vapor-controlled layer against the concrete while maintaining a path for seasonal drying.
- Fix bulk water: Confirm downspouts discharge well away from the foundation, gutters are clean, and soil grading slopes away. Address cracks, active leaks, and interior drain issues before insulating.
- Avoid interior poly against concrete: Polyethylene sheeting on the interior side of concrete often traps moisture. The result can be wet studs, musty odors, and hidden mold.
- Choose appropriate vapor control: Rigid foam or closed-cell spray foam placed directly against concrete limits warm-side condensation risk.
- Air seal thoroughly: Humid interior air that reaches a cold concrete surface will condense. Seal the rim joist, foam seams, and penetrations as carefully as you would a roof.
Solve water entry and air leaks before you insulate. Insulation can’t fix drainage problems—and the wrong vapor control can make them worse.
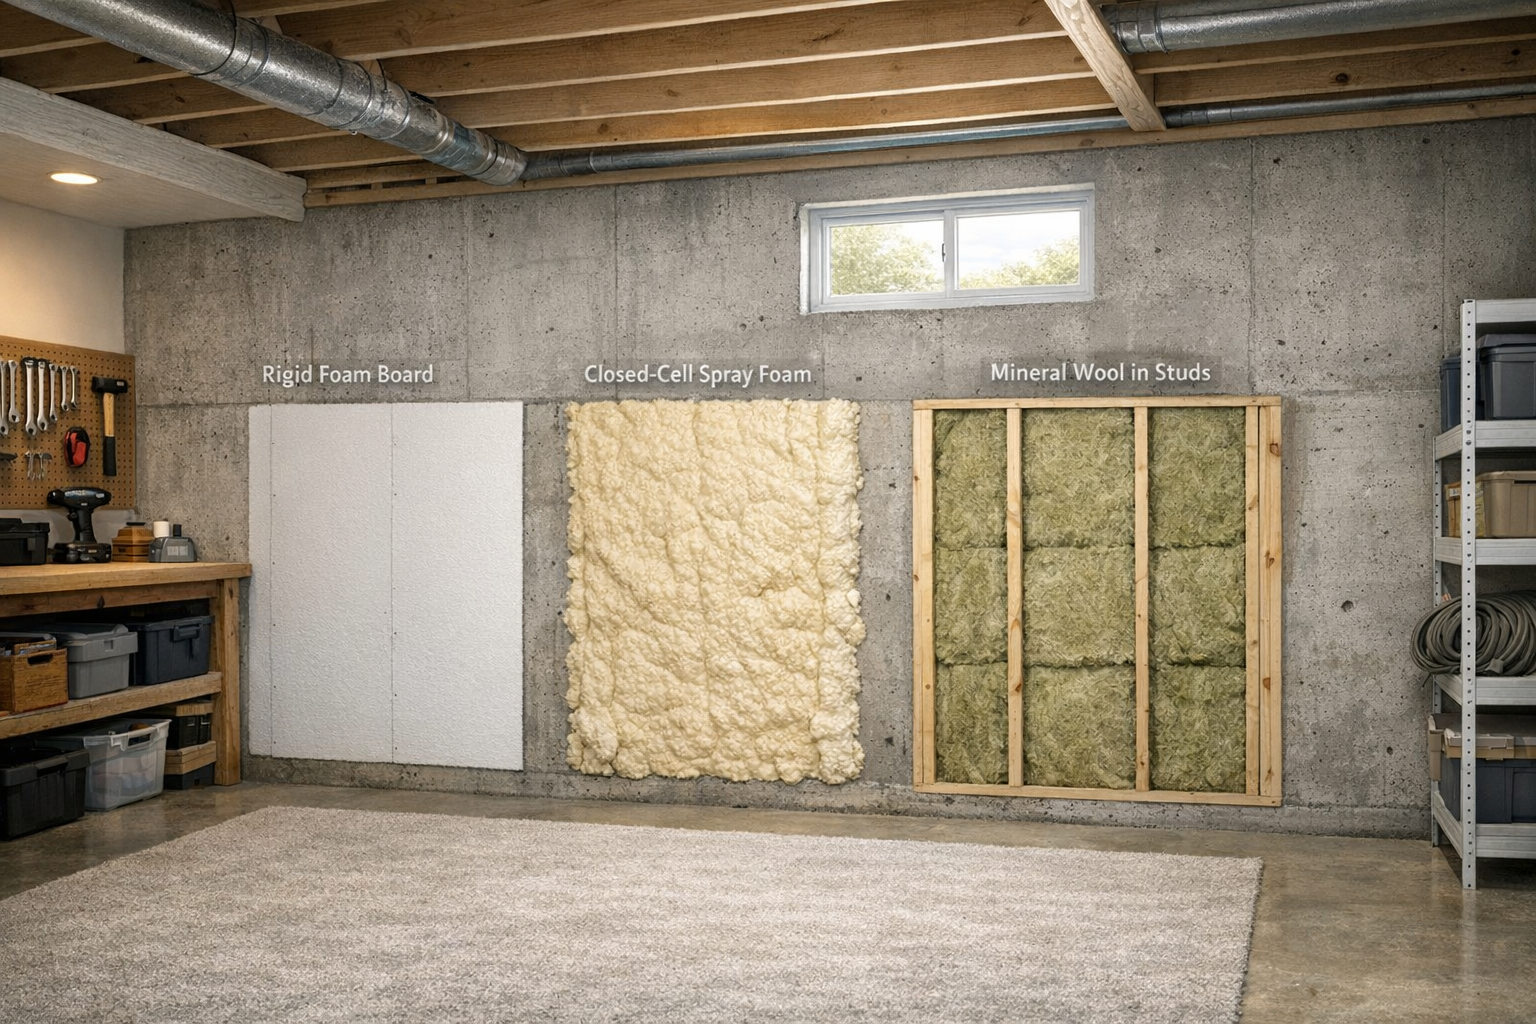
Rigid Foam Board (EPS, XPS, Polyiso)
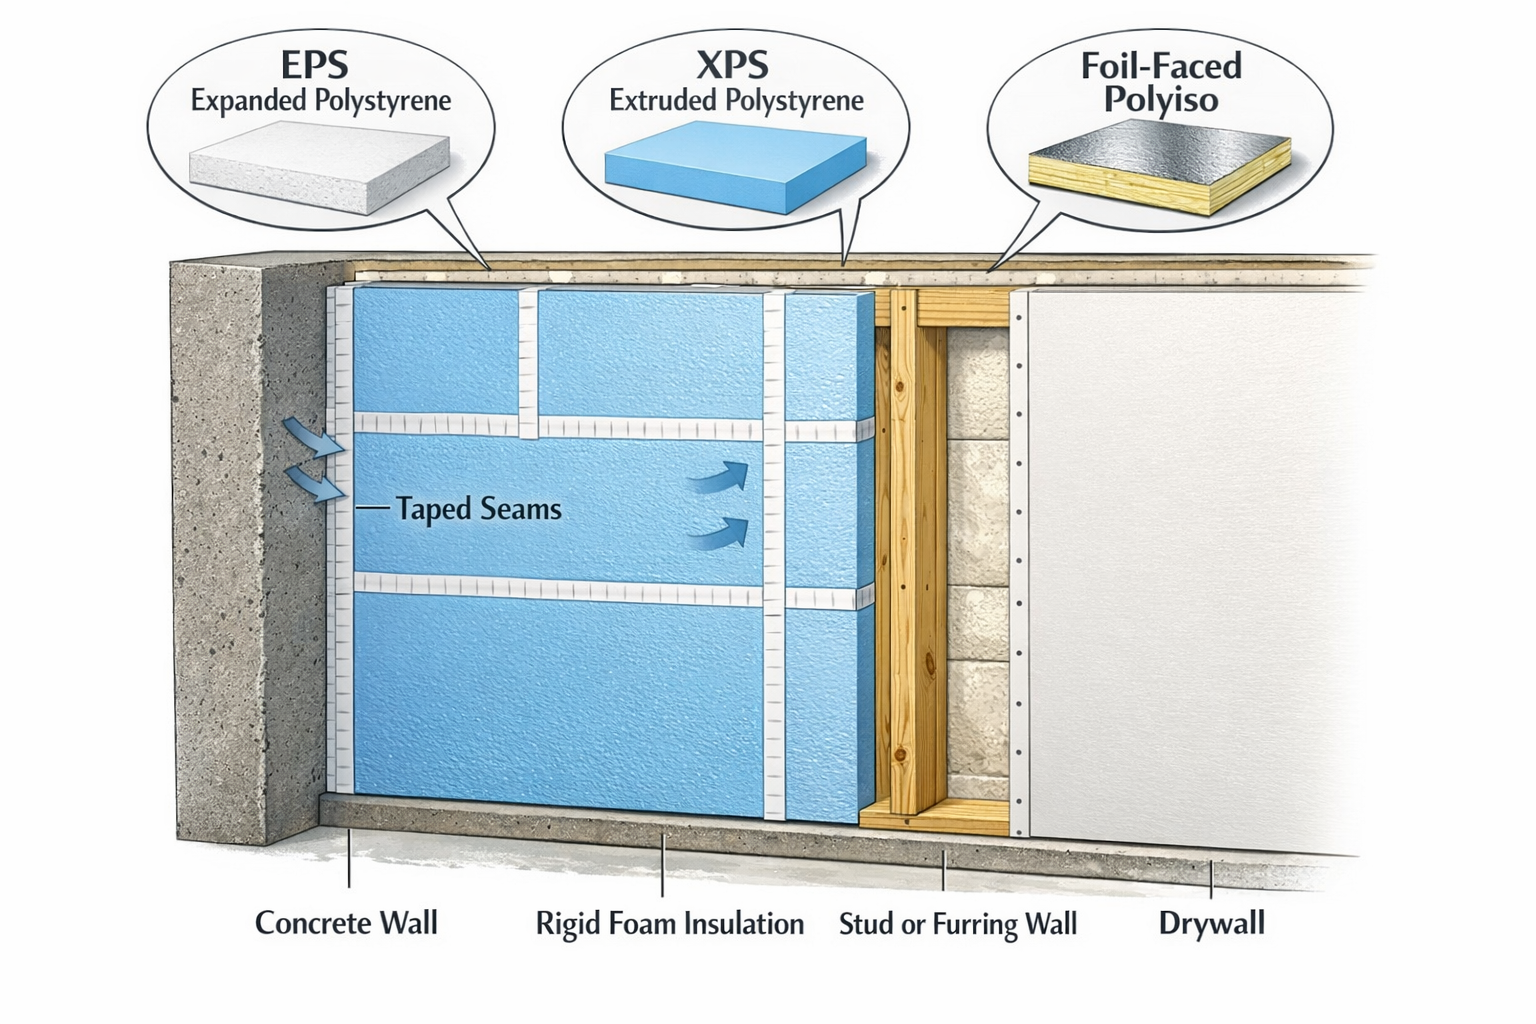
Continuous rigid foam is a top performer for interior basement walls because it reduces thermal bridging and offers predictable vapor control. When seams are taped and edges foamed, it becomes a near-continuous air and vapor control layer.
Material choices and behavior
- EPS (Expanded Polystyrene): R ~ 3.6–4.2 per inch, more vapor-permeable at lower thickness, excellent drying potential, often the most environmentally friendly option.
- XPS (Extruded Polystyrene): R ~ 5 per inch initially, lower vapor permeability, good moisture resistance but higher environmental impact. R-value can decrease slightly over time.
- Polyiso (Foil-faced): Labeled R ~ 6 per inch, but may lose performance in cold, damp conditions. Performs best when kept warm (toward the interior), and the foil facer is a strong vapor retarder.
Installation steps that prevent problems
- Prep the wall: Scrape protrusions and vacuum dust. Mark utilities. Treat cracks and efflorescence as needed.
- Adhere panels: Use foam-safe construction adhesive in ribbons. Press panels to the concrete, staggering vertical joints.
- Seal seams: Tape with compatible foil or acrylic tapes. Foam the perimeter and any gaps with one-part spray foam.
- Add service space: Install 1×3 or 1×4 furring strips or a 2×4 stud wall over the foam. This preserves the continuous insulation while creating a chase for wiring.
- Finish: Attach drywall to furring or studs. Where code requires, meet fireblocking and thermal barrier rules.
When rigid foam is installed continuously against concrete, you drastically reduce the chance that interior air will contact a cold surface. That means fewer condensation risks and better comfort at the floor line.
EPS ~R-3.6–4.2/in, XPS ~R-5/in, Polyiso ~R-6/in (plan conservatively below grade). Continuous foam plus a batt-filled stud wall often delivers R-20+ whole-assembly performance with excellent moisture control.
Closed-Cell Spray Foam
Closed-cell spray polyurethane foam (ccSPF) combines insulation, air sealing, and Class II vapor control in one install. It conforms to irregular stone or rubble foundations and is the gold standard for sealing rim joists and complex transitions.
- Delivers roughly R-6 to R-7 per inch with strong adhesion, stopping convective loops and drafts common in basements.
- Provides a durable air barrier where rigid boards are difficult to fit, such as behind pipes, ledges, and at rim joists.
- Higher upfront cost; professional installation is typically recommended.
- Most jurisdictions require a 1/2-inch gypsum thermal barrier or an approved intumescent coating over spray foam—verify with your local building department.
If you have bowing walls, heavy irregularities, or a rubble foundation that makes foam board challenging, ccSPF often justifies its cost. It’s also a great one-two punch with rigid foam: use ccSPF at the rim and pipe penetrations, and rigid boards on the broad wall surfaces.
Mineral Wool and Fiberglass in Stud Walls
Fibrous batts offer cost-effective R-value, but they should not be the first line of defense against concrete. Pair them with a continuous foam layer against the wall to prevent interior moisture from condensing on cold concrete.
- Never place batts directly on concrete: They’ll absorb moisture, compress, and underperform—sometimes dramatically.
- Mineral wool advantages: Retains R-value when damp better than fiberglass, resists mold, and adds fire and sound attenuation benefits.
- Smart vapor retarders: In colder climates, a variable-perm membrane on the interior lets the assembly dry seasonally while limiting winter vapor drive.
- Sequence matters: Air-seal and insulate the rim joist before installing batts. The rim is often the biggest source of heat loss.
A robust assembly stacks functions: continuous foam for thermal and vapor control, then a stud wall with mineral wool for extra R, and finally a smart membrane under drywall in colder zones. That layered strategy keeps the first condensing surface warm.
Interior vs. Exterior Insulation: Pros and Cons
Both approaches can work; the best choice depends on whether excavation is realistic and what stage your project is in.
Interior systems
- Easier and more affordable for existing homes; no digging required, so you can work any season.
- Pairs well with finishing plans: add a stud wall for services without compromising the continuous foam layer.
- Requires careful detailing at rim joists, slab edges, and penetrations to limit thermal bridging.
Exterior systems
- Ideal during new construction or major landscaping. Keeps the foundation warm and protects waterproofing.
- Offers true continuity: foam can tie into slab-edge and above-grade wall insulation, minimizing bridges.
- More disruptive and costly due to excavation; must coordinate drainage, waterproofing, and insect-termite detailing in some regions.
If you’re upgrading an existing home, interior continuous foam is usually the fastest path to comfort. For new builds or deep retrofits with site work, exterior foam shines by optimizing continuity and moisture protection.
Choosing the Right R-Value by Climate
R-value targets vary by climate zone and local code. As a starting point, many cold regions aim for R-10 to R-15 continuous on basement walls. Warmer mixed-humid climates can often reduce total R somewhat but should double down on air sealing and strategic vapor control.
Cold and very cold climates
- Use 2–3 inches of rigid foam or 1.5–2 inches of ccSPF for continuous insulation. Add a 2×4 stud wall with mineral wool to reach R-20+.
- Consider a smart vapor retarder behind drywall to manage winter vapor pressure and allow spring drying.
Mixed-humid climates
- Emphasize continuity and air sealing over chasing very high R-values. Target around R-10 continuous, then add cavity insulation if needed.
- Maintain some inward drying—avoid interior poly; use smart membranes where appropriate.
Marine and mild climates
- Continuous foam remains valuable for comfort and moisture control even if energy savings are smaller.
- Detail terminations and transitions carefully to prevent coastal moisture ingress and salt-laden air issues.
DIY vs. Pro: Installation Steps and Safety
Many homeowners can handle foam board installations with patience and attention to detail. Complex moisture conditions, spray foam, or integration with exterior waterproofing are best left to experienced pros.
DIY-friendly path: Rigid foam plus service wall
- Map utilities, snap reference lines, and pre-cut panels to reduce mess.
- Adhere foam with compatible adhesive; stitch the field with long tapcons and fender washers if walls are uneven.
- Tape all seams; seal edges and penetrations with one-part foam.
- Frame a 2×4 wall spaced slightly from the foam to run electrical and to protect the air/vapor layer.
- Install mineral wool batts if desired; consider a smart vapor retarder in cold zones.
- Hang drywall; address fireblocking and thermal barrier rules before inspection.
Pro-recommended scenarios
- Closed-cell spray foam applications and rim joist encapsulation.
- Active water problems requiring drains, sump systems, or exterior waterproofing.
- Historic stone or rubble foundations with irregular profiles.
- Projects needing rapid turnaround or integrated HVAC and dehumidification planning.
Budgeting, Payback, and Common Mistakes
Insulation upgrades pay you back in comfort immediately and in energy savings over time. The best value often comes from continuous rigid foam plus a stud wall with mineral wool batts, though spray foam may be worth it for complex basements.
Cost and value notes
- Rigid foam + batts: Generally the best dollar-per-R and easiest to plan around windows and utilities.
- Closed-cell spray foam: Higher upfront cost, but exceptional air sealing—especially valuable at the rim and irregular surfaces.
- Mineral wool batts: Slightly more than fiberglass but more resilient to incidental moisture and better acoustics.
Avoid these pitfalls
- Interior poly against concrete: Traps moisture and can rot studs—skip it in favor of foam-based vapor control or smart membranes.
- Untaped seams and unsealed edges: Small gaps invite humid air to cold surfaces. Tape, foam, repeat.
- Ignoring the rim joist: A leaky rim can undo much of your wall insulation’s benefit.
- Over-penetrating the foam: Plan a service cavity to avoid peppering the foam with holes for wiring and hangers.
- Downspouts, grading, and leaks addressed
- Continuous foam or ccSPF installed and fully sealed
- Rim joist air-sealed and insulated
- Service cavity framed; electrical routed
- Smart vapor retarder installed (if climate-appropriate)
- Fireblocking and thermal barrier details ready for inspection
How Different Assemblies Compare
1) Continuous rigid foam (EPS/XPS) + service wall
Best overall value A workhorse solution for most existing basements. Two inches of EPS or XPS (R-8 to R-10) plus a 2×4 wall with mineral wool delivers R-20+ whole-assembly performance and excellent moisture resilience.
2) Closed-cell spray foam (2–3 inches)
Maximum air seal Excels at the rim joist and irregular foundations. Often finished with drywall on furring strips or a thin stud wall for services. Ensure code-compliant thermal barriers.
3) Hybrid foam + batts with smart membrane
Climate-flexible A thin layer of foam for condensation control, then mineral wool batts. Add a smart vapor retarder in cold climates to keep the assembly robust across seasons.
Step-by-Step: Insulating an Unfinished Basement Wall
This walkthrough assumes you’re using rigid foam plus a stud wall—an effective, DIY-friendly method.
- Assess moisture: After rain, check for damp spots. Fix gutters, grading, and leaks first. Add a dehumidifier if relative humidity stays above 55–60%.
- Clean and prep: Knock off protrusions and vacuum. Plan around electrical panels and gas meters. Mark lines for foam height and framing.
- Install foam: Start at a corner. Adhere full-height panels, scribe cuts for irregularities, and keep joints tight. Stagger vertical seams.
- Seal it tight: Tape every seam. Use one-part foam at the top and bottom edges and around penetrations.
- Frame the wall: Frame a 2×4 wall just inboard of the foam. Keep it plumb and square. Use treated bottom plates on slabs.
- Add services: Run electrical and low-voltage wiring in the stud wall. Add blocking where cabinets or wall-hung fixtures will go.
- Boost R-value: Install mineral wool batts for sound and thermal performance. Avoid compressing batts; cut to fit around boxes.
- Vapor-smart layer (as needed): Staple a variable-perm membrane on the warm side in cold climates; tape overlaps and service penetrations.
- Close and finish: Install drywall. Seal the drywall-to-floor and drywall-to-ceiling joints with caulk for extra air control. Follow fireblocking rules.
Code, Health, and Durability Considerations
- Thermal barriers: Most spray foam needs 1/2-inch gypsum board or an approved intumescent coating.
- Fireblocking: At the top of stud walls and at penetrations between floors, install fireblocking per code to stop hidden air movement.
- Combustion safety: In homes with fuel-burning appliances, confirm proper combustion air and test for backdrafting after tightening the envelope.
- Indoor air quality: Choose low-VOC adhesives and tapes. Ventilate during installation and initial curing phases.
- Pest detailing: In termite zones, include inspection gaps or approved barriers when using foam on foundations.
Troubleshooting: If Things Go Wrong
Condensation or musty odors after insulating
- Check for untaped seams, unsealed foam edges, or leaky rim joists. Air leaks are the usual culprit.
- Verify downspouts, grading, and that sump pumps operate correctly.
- Use a hygrometer. If RH stays high, add dehumidification and increase air circulation.
Visible damp spots on drywall
- Investigate for bulk water intrusion. Open a small inspection area to verify assembly layers are intact and dry.
- Confirm that no polyethylene sheet was installed on the interior side of concrete.
Cold floors above the basement
- Target the rim joist and top-of-wall transitions. Sealing these can noticeably warm first-floor floors.
- Consider insulating the slab perimeter and adding area rugs or subfloor panels if finishing the space.
Conclusion: A Clear Path to a Warmer, Drier Basement
Start with water management and airtightness, then add continuous insulation that keeps the first condensing surface warm. For most homes, that means rigid foam against the concrete, a service wall for wiring, and—if climate demands—mineral wool plus a smart vapor retarder. Closed-cell spray foam is a powerful alternative for irregular walls and rim joists, provided you meet thermal barrier requirements.
When in doubt, remember the priorities: fix bulk water, air seal meticulously, use continuous insulation, and coordinate code details before closing walls. Done right, you’ll gain a comfortable, healthy, and value-adding space that stands up to time and seasons.
Transform Your Basement With the Right Insulation Strategy
Start with moisture control, add continuous insulation, and finish with code-compliant details for a warmer, healthier home.